Engineering was defined at the beginning of this unit as the application of practical and scientific knowledge to the solving of a problem through the use of a methodical process. Discussed above were some different types of knowledge that engineers apply to solving a problem, but the process itself has not been mentioned. What methodical process do engineers use to solve problems?
The engineering design process is a series of steps that engineers follow when they are trying to solve a problem and design a solution for something; it is a methodical approach to problem solving. This is similar to the “Scientific Method” which is taught to young scientists. There is no single universally accepted design process. It seems as though most engineers have their own twist for how the process works. The process generally starts with a problem and ends with a solution, but the middle steps can vary.
One can think of the engineering design process as a recipe for banana bread; it can be made a lot of different ways but it’s usually going to start with bananas and it’s going to end with a loaf of bread. One such “recipe” for the engineering design process will be outlined in this unit; this is not the only correct version of the process, it is just one example. It will provide a good starting point for students to explore the engineering process.
The design process in its simplest terms can be seen as a 3-step loop:
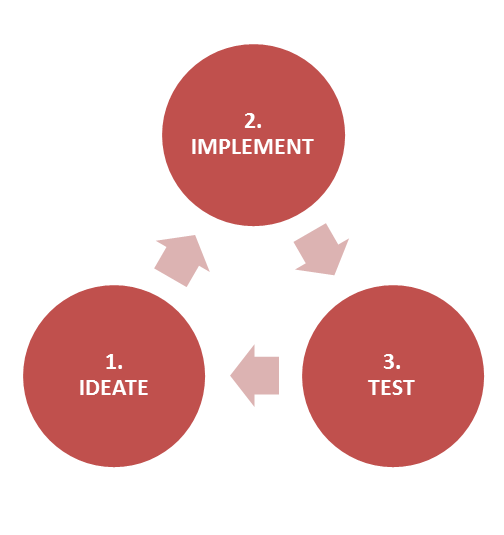
In this simple design loop an idea is generated (1). This idea is implemented (2). After the idea is implemented, the design group would test the product or evaluate the result of the implementation through testing (3). Typically, during this testing and evaluation, additional ideas are generated, and the process starts over again. This cycle and repetition is why it can be said that design is an iterative process.
Iteration is the act of repeating something over and over again in order to improve the process and eventually achieve a desired goal.
Obviously this process could go on forever (or until the design group stops thinking of new ideas and stops finding problems with the design). There is a saying sometimes used by veteran engineers: “At some point in every design process someone needs to get rid of the engineer and just build the thing!”
USING THE ENGINEERING DESIGN PROCESS:
As discussed above, there is no single engineering design process. Throughout this course students will use an 11-step design process as they conceptualize, design, and create a robot to compete in head-to-head robotics competition. The process used is seen below.
Step 1 – UNDERSTAND – Define the Problem
Step 2 – EXPLORE – Do Background Research
Step 3 – DEFINE – Determine Solution Specifications
Step 4 – IDEATE – Generate Concept Solutions
Step 5 – PROTOTYPE – Learn How Your Concepts Work
Step 6 – CHOOSE – Determine a Final Concept
Step 7 – REFINE – Do Detailed Design
Step 8 – PRESENT – Get Feedback & Approval
Step 9 – IMPLEMENT – Implement the Detailed Solution
Step 10 – TEST – Does the Solution Work?
Step 11 – ITERATE
STEP 1: UNDERSTAND
In this step engineers will define the problem they are trying to solve.
This is the single most important step in the design process. Without fully understanding the problem how can an engineer solve it successfully? This step is often done incorrectly or incompletely and results in a failure of the design. It is important to define the true problem one is solving, not just the symptoms of the problem or the perceived problem.
When trying to define the real problem, remember the elevator riddle, as follows.
There is a story about a skyscraper which is told to young engineers to emphasize the importance of this step in the design process. The story goes that there was a skyscraper in a major city and the occupants of the building were complaining that the elevator ride times were too long. The owners of the building wanted to fix this, so they put out a call to several local engineering firms asking them for proposals.
1. One firm put in a bid to renovate the office and add two additional elevators. They speculated that adding more elevators would cut down on elevator stops and decrease the average ride time. They estimated this would cost some ludicrous amount of money (details vary based on the telling.)
2. Another engineering firm suggested renovating the building and adding some brand new, state of the art, high-speed elevators. These faster elevators would also reduce ride time. This suggestion didn’t cost as much as the first proposal, but was still a ridiculous amount of money.
3. The third engineering firm came back with a proposal to upgrade the elevator software. They claimed that they had devised a new algorithm that would more effectively utilize the elevators already in place to cut down on average ride time. This proposal was still somewhat expensive, but much cheaper than the other two.
The owners of the building were just about to hire the third firm when a fourth proposal was presented. After detailed review, the fourth proposal was immediately implemented. The fourth engineering firm suggested that full-length mirrors be installed in every elevator. When the building residents were in front of a mirror, they fidgeted and adjusted their ties, checked their make-up, and so forth and didn’t notice the length of the elevator ride. This proposal didn’t cost the owners very much at all and was dubbed a great success. The fourth company understood that the real problem wasn’t that the elevators were too slow, but that the residents thought the ride times were too long.
UNDERSTAND for Competition Robotics
In competitive robotics there are typically numerous problems that need to be solved by the design team. The further designers get in their robot design, the more problems come up (the main problem is often broken down into smaller problems). Early in the robot design the problems may be more “big picture” and later they will become more “detail oriented.”
Some sample problems a designer may encounter that need to be solved, and questions that need to be answered are below.
What is the most effective strategy for playing the game? How do we win matches?
How can the robot score the most points during the match? How do we score more than our opponents?
How fast does the robot need to move?
How can the robot pick up the game object?
How can the robot pick it up quickly?
How many game objects does the robot need to hold?
These problems and questions all have many answers; some answers are better than others. How does a designer go about finding the “correct” solution or the “correct” answer? That is where the rest of the process comes into play, but until the correct problem is defined it can never be solved!
STEP 2: EXPLORE
In this step engineers will do background research on the problem their solving. They will investigate the ways others have tackled similar problems. Engineers will also gather details on the environment they’re dealing with, the situations their solution will be used in, and the ways it will be used.
EXPLORE for Competition Robotics
Students involved in competition robotics will also need to explore their challenge. They should investigate challenges from the real world similar to the one they are solving. Students can also look to see if any other robotics competitions have utilized similar challenges in the past. This section is all about gathering data from other sources to help student robot designers create a successful solution.
STEP 3: DEFINE
In this step engineers will specify WHAT the solution will accomplish, without describing HOW it will do it. They do this through the use of specifications.
What are specifications? A specification is defined as an explicit set of requirements to be satisfied by a material, product, or service. In this case, specifications are requirements for the solution of the problem defined in Step 1 of the design process.
Specifications typically come from two places:
1. Design Constraints
2. Functional Requirements
What are constraints? A constraint can be defined as a condition that a solution to a problem must satisfy. Constraints, in short, are restrictions. What are functional requirements? Functional requirements describe how well the finished solution must perform.
Again, specifications outline WHAT the solution will do and how WELL it will do it, not HOW it will do it. In Competitive Robotics the specs would describe WHAT the robot does, not HOW it does it. Thinking too much about “how” at this stage in the process can be counter-productive and may stifle creativity. At the same time, designers need to keep the “how” in the back of their minds because they need to have a basic understanding of what is possible. (For example, specifying that a new laptop computer will run continuously for one year off a single AA battery is not reasonable.)
DEFINE for Competition Robotics
In competitive robotics, designers are presented with some challenge or game in which their robot will compete. This challenge often includes a manual containing a series of restrictions and requirements that every robot must fulfill; these are design constraints. This is the first type of specification a designer encounters during the process. Some examples of this type of spec are “maximum robot starting size” and “maximum number of motors allowed.”
Some specifications are also due to the resources available to the designer. Since the first set listed above are present in the competition rules they are apparent to all designers. This second set of restrictions is not always as obvious but it is equally as important to consider during the design process. Some of these may be self-imposed design constraint type specifications. Two examples are “robot must fall within designer’s budget” and “robot must utilize parts the designer already has.”
Another self-imposed design constraint revolves around the team’s capabilities.
One of the most important parts of successfully generating design constraints in competition robotics is to understand one’s limitations. Many teams are tempted to overstretch their capabilities by exciting designs.
Every team needs to understand exactly what they are capable of so they don’t end up missing a target. Capabilities often depend on manpower, resources, budget, experience, and more. It is important to focus on the big picture when determining whether a design is achievable. When divided up, each piece may seem doable while the overall system is “too much.”
Teams will often be more successful by choosing a simple design and executing it very well than by choosing a complex design that they are not capable of executing! For instance, consider that two teams are trying to build robots to put a soccer ball in a soccer goal. One team decides to build a simple plow to push the ball into the goal. The other team tries to build a kicking mechanism to kick the ball into the goal. The kicking mechanism may seem like the better solution, but what if the second team can’t actually finish building their kicker? In this case, the simple solution would win! The second team should have considered their ability to complete the project before deciding.
The next group of specifications comes from the designer’s functional requirements for the robot. These are things the designer believes the robot should be capable of and are performance based. Many of these are related to the challenge placed before the designer (i.e., robot can hold 10 game objects, robot can lift game objects one meter, etc.)
It may be difficult or even impossible to generate this third type of spec early in the design process, as most of them are dependent on the nature of the design and how it progresses. These are more common during some of the sub-design processes than for the overall system.
Specifications Ranking
All specs are not created equal, some are more important to the design than others. Designers need to think about what is most important, and why. Specifications are often ranked in some way to denote their importance. One such scale is:
W = Wish (not that important, but it would be nice if it is possible)
P = Preferred (important, but the project won’t fail without it)
D = Demand (critical to the project, MUST be included)
With these, a designer would go through and rank the specifications. These provide a good “check” for the designer at the end of the project. It is easy to go back down the list of specifications and see how well the design fulfilled them.
Designers must make decisions about what is most important when they apply these rankings. Ranking the specifications in this way will also make it clearer in the designer’s mind what to focus on. Some rankings are easier than others, for instance the constraints REQUIRED by the design challenge itself are obviously ranked as “Demand.”
When creating specifications some designers will list several similar specifications at different rankings to show varying degrees of importance. An example of this can be seen below:
Robot can hold 5 game objects – Demand.
Robot can hold 10 game objects – Preferred.
Robot can hold 15 game objects – Wish.
In this example the specifications make it clear that the robot MUST hold 5 game objects, if possible it should hold 10, and the designer would be very happy if it held 15 game objects. Through the use of good specifications and ranking it is possible to outline exactly what requirements the design team should follow and what goals the design team should strive to meet.
STEP 4: IDEATE
Ideate means to formulate, imagine, or conceive of an idea.
Now that the engineer knows WHAT the solution will do, he or she must determine HOW it will do it.
Two words: “Napkin Sketches.” This phrase refers to the habit of jotting down ideas whenever and where ever they occur - even if you have to jot them down on a napkin.
Everyone does the same thing when faced with a problem or a decision to make: they think of alternative courses of action, even if they do this subconsciously. Formally documenting this intuitive action may help when solving complex engineering problems.
This is a step that requires some creativity. Some of the questions most commonly asked of engineers are, “How did you come up with that?” and “Where do you get your ideas?” Ideas come from everywhere! Inspiration can come from anywhere!
The keywords here are: “imagination” and “think.” This is where the designer needs to brainstorm multiple ways to fulfill the specifications. It is important to remember to look for inspiration everywhere. A common mantra is, “steal from the best, then invent the rest.” Good designers will look in the world around them and try to find solutions to adapt to their problem and build off of. Innovation is also important early in the design process (don’t wait to innovate, always put innovation first); there is a good balance to be found between “thinking outside the box” and “using pre-made designs.”
Often combining two ideas or compromising between two different suggestions may yield a good concept. Again, improvements and innovations early in the process will yield better results later in the process.
It is important not to settle for mediocre concepts and to strive to find the “right” solution. Often this “right” solution reveals itself. Designers will often comment, “It just feels right.” The “right” solution will just seem elegant. Unfortunately it is not always this easy, and elegance is not always so apparent.
Engineers should record ALL ideas in their engineering notebook!
(It is important for engineers to copy their napkin sketches into their engineering notebooks so they have an organized record of their thought process and ideas.)
IDEATE for Competition Robotics
In competition robotics there are a number of concepts that need to be generated. Teams need to generate concept strategies, concepts for the overall system, and concepts for individual subsystems and mechanisms. Some of these systems will be dependent on and influence each other. The team’s strategy will affect the overall system design, which in turn affects the different subsystems, but each of the subsystems will also affect the overall system.
These concepts are typically generated in brainstorming sessions involving the whole competition team. Concepts are recorded as diagrams, sketches, and descriptions into individual team member’s engineering notebooks.
Brainstorming – Group Creativity Technique
This stage in the engineering design process requires great creativity and the generation of a number of options for the problem’s solution. To accomplish this, one must use an engineering tool known as BRAINSTORMING. Brainstorming is an exercise in which groups of individuals work together to generate large numbers of ideas.
Some important rules for brainstorming:
1. When brainstorming, teams focus on the quantity of ideas generated, not the quality. The premise is that from lots of ideas will come a few great ones!
2. Reserve judgement. There are no bad ideas during the brainstorming session, because even the most outlandish concept could inspire someone else to come up with something great. Crazy ideas may also be improved and developed during the collaborative process and become feasible ideas.
3. Record everything. Student designers should document all the ideas generated during brainstorming in their engineering notebooks.
STEP 5: PROTOTYPE
In this stage of the process engineers takes some of their concepts from the previous step and make mock-up versions of them. The goal of this stage is to learn how each concept solution will function in “real life” and how it interacts with the real environment. This is also where a designer will start to determine which design concept will work the best. These prototypes are designed to be crude, but functional enough to be educational to the designer. The keyword here is “LEARN.”
Designers don’t need to prototype everything, just the things they want to work!
PROTOTYPE for Competition Robotics
In competitive robotics, the robots must often interact with their environment and designers must learn the nature of these interactions to be successful. Designers should test in “real world conditions” to see how things interact, and find places for improvement EARLY in the design. The VEX Robotics Design System is perfectly suited to the kinds of quick prototypes designers need to perform in competition robotics. It is easy to quickly build something up, test to see how it works, and tweak it – all without any manufacturing capabilities.
Teams should be very meticulous during their prototyping. Students should take detailed notes in their engineering notebooks during the prototyping process, recording what they see, trying to figure out why some things work better than others, and then creating additional prototypes to test these ideas. Gathering data is an important part of prototyping.
STEP 6: CHOOSE
At this point in the process the designer or design group has several different potential solutions for the problem. This step is where the designers will use the lessons learned from their prototyping to determine which concept is best and go forward with it. This is not always an easy decision. Sometimes the “right” solution just reveals itself. Other times it is difficult to even define “best.” Teams can compare how each concept fulfills the specifications from step three in the process and see if one is significantly better than the others. Designers should look for the simple and elegant solution.
In the event that there is no obvious solution, a more methodical approach must be used to make the decision.
When choosing concepts as a design group, it is tempting to rely on a vote. However, a vote is nothing but an unjustified opinion, and an unjustified opinion isn’t worth much in an engineering discussion. When it comes to design decisions it is better to talk through things and make a logical decision by building consensus. As discussed previously, it is important to be as quantitative as possible; one shouldn’t just say something is “better,” they should say it is “14.8% lighter” and then prove why that makes it better.
In some cases the decision-making is not made by the whole design group, but by a smaller leadership group or even by a single leader. In this situation the leadership is responsible for impartially comparing each of the alternatives and then choosing the course of action. This method does not always work well, especially if the rest of the design group does not recognize the authority of the leadership and questions the final decision. However, this method can be useful in preventing stalemate situations where no consensus can be reached. To help get the group’s approval, some leaders will try to use a form of consensus building, leading up to the final decision.
CHOOSE for Competition Robotics
The challenges faced by student designers in competition robotics are almost identical to the ones faced by real engineers. Students must work together with their teammates to figure out which concept best fulfills the design specifications, which really means, “Which concept works best to solve the problem?” Students should rely on prototypes to help them make this determination. It is important for students to remember to use quantitative arguments to show how one option is better than another; the easiest way to do this may be to prove it with a prototype.
Decision Making Tool: Weighted Objectives Tables
One tool used to help during the concept selection stage of the design process is the weighted objectives table (WOT), sometimes referred to as a decision matrix. The weighted objectives table can be used to help designers choose between options based on how they are ranked on several criteria. The WOT is an especially effective tool because of how it helps a designer compare alternatives based on what is most important to the final solution.

For more information on using a weighted objectives table to choose between concepts, refer to Appendix 7 – Using a Weighted Objectives Table.
STEP 7: REFINE
This is the stage of the design process where engineers take their chosen concept and make it into something more “real.” This stage is all about the details. At the end of this stage design teams should have everything necessary so that the full design can be constructed or implemented. Some of the pieces that may be generated during this step are CAD Models, Assembly Drawings, Manufacturing Plans, Bill of Materials, Maintenance Guides, User Manuals, Design Presentations, Proposals and more.
These designs will start off very basic and evolve as more details are added. It is not practical to start by detailing every piece of the solution until one sees how the pieces fit together. These basic pieces are then refined into more detailed pieces that are part of the final design.
REFINE for Competition Robotics
In competitive robotics it is a good idea to make a 3D model of the entire robot in Autodesk Inventor. This can be one of the longest stages in the design process, but the work pays off. The more work put into the design of the robot, the easier it will be to make it.

The devil is always in the details of the design.
By spending time CADing all the detail, any issues will be solved before they become serious problems.
This step in the process is also when design calculations are completed. These calculations can refer to optimizations of gearing, material strength, weight, cost, and more. In an abbreviated design process it is not always possible to fully optimize all aspects of the design. Depending on the project, sometimes getting it “close enough” is all that is needed. Many designers can plan things using simply their prior experiences and intuition rather than calculating every detail; this kind of thinking may work fine for a high school robotics project, but wouldn’t be acceptable when designing pieces of a spacesuit where optimization is important. Rather than optimize each piece, just ensure it can do its job. It is okay to “over build” so long as none of the specifications are violated.
STEP 8: PRESENT
The detailed design must often go through some sort of design review or approval process before it can be implemented. A design review can come in many forms. Some reviews occur as a simple conversation between two of the designers. Some reviews are done as a meeting of the Design Group where they recap and check the work that has been completed and try to find any errors. Many reviews involve presenting the detailed design to a customer, manager, or some other decision-maker for final approval.
PRESENT for Competition Robotics
In competition robotics, the robot designer or design group needs to present the final robot design to the rest of the team, to their class at school, or to the team leadership for final approval. Sometimes a team will do a very formal design review meeting and invite sponsors, school administrators and community members to participate.
Design Presentations are an important part of the engineering process. Many engineers believe that language arts type classes are not important to them, and that they have an excuse for poor spelling, bad grammar or poor communication skills. This could not be further from the truth. If an engineer has an idea, but cannot communicate it effectively, it is not helpful; if an engineer has an opinion but cannot express it, it is not going to help solve the problem. The ability to summarize, present, and defend ideas is a skill that is absolutely critical! This applies to verbal communication, written reports, slideshow presentations, engineering drawings, and other types of media.
The goal of a design review is not simply to approve the design; it is also to find any problems with the design or potential places where the design can be improved. During the design process, several alternative concepts were generated and one was chosen. There are many such choices made during the design process. Justifying these choices is one of the key parts of the design presentation. “WHY did you do it like THAT instead of like THIS?” The review group needs to ensure that the designers have done “due diligence”, meaning they need to see that alternatives were investigated. They need to verify that the design is well thought out and is not just the first thing that popped into someone’s head.
Designers should take detailed notes at Design Reviews in their engineering notebooks, including a list of action items to be accomplished later.
Common questions from a Design Review:
- Why was it done this way?
- Did you think of doing it a different way?
- Why did you rule out other alternatives?
- Does it fulfill our requirements and specs?
- How can we make it function better?
- How can we make it weigh less?
- How can we make it faster?
- How can we make it more robust?
- How can we make it smaller?
- How can we make it simpler?
- How can we make it more efficient?
- How can we make this cheaper?
- How can we make this easier to construct?
- What other functionality would be easy to add?
Cost-Benefit Analysis
When reviewing a design it is sometimes important to perform a cost-benefit analysis. When performing this kind of analysis, a designer will look at an aspect of the design to see two things: what it costs, and how much benefit it provides. The designer will then determine whether the benefit was worth the cost of implementation.
“Cost” does not always refer to money. A feature’s cost refers to the resources that must be diverted to it; these could be time, personnel, money, space on the robot, weight, and more. It could also refer to items that must be sacrificed in order to implement the feature being analyzed. (i.e. “If we build a 2 jointed arm, we won’t have room for a ball intake on the robot.”)
Features that provide a BIG benefit at a small cost are the kind that should be added to the design (it is important to look for these at all stages of the process; a simple addition can often provide big results). High cost items should only be implemented if they provide a big benefit! These considerations are important ones, and designers need to keep them in mind.
STEP 9: IMPLEMENT
Once the design has been completed and approved, it needs to be implemented. Depending on the nature of the problem being solved, the solutions to the problem could vary wildly. Depending on the type of solution, the implementation could also vary. The implementation could consist of using a new process that was designed, or it could consist of following a manufacturing plan and producing some physical object. For instance, in the example of the elevator riddle discussed previously, there are a number of solutions proposed and these solutions all took different forms.
If an engineer is trying to solve how to tie shoes faster, they are designing a process for tying shoes. Their implementation would be to tell people about their new shoe-tying procedure. If an engineer is trying to design a better shoe, their implementation would the manufacture and sale of the new shoes. Implementations can take many forms.
IMPLEMENT for Competition Robotics
In competition robotics, this is the phase where students “build the thing.” All the details done in Step 7 are used to create a finished, functional robot to compete with (or a subsystem that is part of a larger finished product)! This stage can involve purchasing components, cutting parts, assembly, and more - anything it takes to produce a final product.
This is also the stage where a team would produce marketing packets, award submissions, and other materials related to their competition, but not associated with the robot. These items are all part of the final implementation.
STEP 10: TEST
In this stage engineers will test their implemented solution to see how well it works. The implementation must be reviewed to see what worked, what didn’t, and what should be improved. The testing procedures and results should be well documented. The main thing that should be determined during this stage in the process is whether or not the final implementation performs as expected and fulfills the specifications.
So what happens if the design is not found to be acceptable? The design group must find a way to make it acceptable! The design group needs to come up with a plan of improvement to get the solution up to snuff. Their plan may include starting over and going back to the drawing board to create a new plan entirely.
Once the solution has been implemented, the analysis completed, and the design has been found acceptable, the design process is complete.
TEST for Competition Robotics
In competition robotics this testing can occur during the competition. When the robot is on the field during a match, it is apparent exactly how well it functions! However, this is not a good situation. Most robotics teams would prefer to know how well their robot will function BEFORE it takes the field. This is why in an ideal situation teams complete their robots with plenty of time to test and improve it. Continuous improvement is the key to success. Planning ahead for this will allow for testing and adaptation before the competition.
STEP 11: ITERATE
There were several mentions during the design process of repeating certain steps multiple times until an acceptable result is achieved. This act of repetition is known as “iteration.” This iteration results in a better end result and is one of the most important parts of design; this is why it is said that design is an iterative process!
Students may be familiar with iterative design from their language arts studies. When a student writes an outline, then a rough draft, then a final paper they are completing three iterations of their final paper, refining each one. These iterations make the final paper much better.
One important thing designers should note is that iteration does not just take place at the end of the process, it will happen during EVERY stage in the process.
The design process is NOT a linear thing; it is common to jump from step to step. Sometimes a design team may jump back and forth between steps one and two several times before ever moving onto step three. Design teams should NOT be afraid of going backward in the process. At any step in the process, a design team may find themselves skipping backwards to any other step. The ultimate goal is to create the best design possible by improving it over and over again. Repeat parts of the process to improve the final result.
The greater the number of iterations a design goes through, the better the final result will be, so why would a designer ever stop iterating? At first each repeat will result in large improvements to the design, but the longer the process goes on, the fewer problems there will be to fix and the smaller the improvements. This is known as the law of diminishing returns. Improvements to the design will get smaller with each successive improvement. Eventually a designer may decide that the next improvement is too small to be worth the effort, and the design is good enough.
Some designers take longer to call a design ”finished” than others because they strive for perfection. Unfortunately, in the real world it is not always possible to achieve perfection. In the real world, if an engineering contractor misses a deadline, they may not get another chance, and they may have trouble finding other contracting jobs!
ITERATE for Competition Robotics
In competition robotics, how does one reconcile the benefits of continuous (and potentially never-ending) improvement with the need for project completion? Simple: each team needs to set a schedule, and then stick to it. This schedule will vary greatly from team to team depending on their circumstances. If a team has six weeks to design and build their robot before they must ship it, they should come up with some sort of schedule for this time period. This schedule can vary in detail greatly. Some teams will plan out each and every step in the process while others will just do a quick overview.
The schedule is not always set in stone; ultimately the only fixed dates are the project start date and the robot completion deadline (usually the date of a competition). Everything else is likely to shift as the process unfolds. Many teams in competitive robotics know these shifts will occur, so they don’t even bother trying to plan a schedule in detail.
SUBSYSTEM DESIGN:
How is a design process like an onion? They both have layers! There are often smaller design processes within the main design process. One may end up using a “mini” design process for a small part of the overall design, and then using a smaller process for one aspect of that mini process. To make this easier, the overall design is sometimes broken down into smaller chunks that can be worked on independently. These are referred to as subsystems.
There may be several parallel processes occurring at the same time, each interconnected as part of the overall system. These different layers will probably depend on each other to a certain extent, if only at some interface point. The nature of this System Integration will be discussed later on.